Securing FTP on the Internet

File transfer security is important when transferring files across the Internet. One of the often overlooked areas, when addressing layered security, is file transfer security. Some companies (including Internet Service Providers) seldom make the switch, in a timely manner, to replace File Transfer Protocol (FTP) clients with a secured solution such as Secure FTP (SFTP) and a Secure Shell (SSH2) Server. Other companies replace Telnet servers with SSH servers, but do not address file transfer security. Then there are companies that implement SFTP with an SSH2 Server, and overlook users that utilize FTP clients for file transfers in other areas. This article provides the answers that you will need to configure and operate an SFTP client (SecureFX) with an SSH2 Server (WinSSHD) –securely.

When was the last time that confidential data was delivered over a standard non-secure transfer program, such as an FTP client, in your company or over the Internet?

Companies sending sensitive files over a network – unencrypted and unprotected – may find it more difficult to establish secure transfers and an overall sense of ‘real’ data security. File transfers that use the standard File Transfer Protocol (FTP) are susceptible to eavesdroppers, and can greatly benefit from the high level encryption ciphers and security that SSH2 protocol offers. By implementing an SFTP client with an SSH2 Server organizations can expect to achieve an effective level of file transfer security.

Transferring files (manually or automatically) can be done without security, however, with the availability of SSH2 – and the ease of setup of an SFTP client and an SSH2 server – confidential file transfers no longer have to be exposed to unwanted network solicitors. Let’s begin to secure your file transfers by configuring an SFTP client and SSH2 server. In this case we’ll use SecureFX by Vandyke Software (www.vandyke.com), and WinSSHD Server by Bitvise Products (www.bitvise.com).

NOTE: It is important to note that the hands-on tips included in this article (as with other articles I have written) have been fully tested in a live production environment that supports many users and file transfer requirements.

The SecureFX client requires SSH2 (I’ll describe SSH2 later) utilizes an interface similar to Windows Explorer, is quickly configurable with password authentication and public key support, and works very well with WinSSHD Server to establish a ‘real’ sense of security moving forward. A 30-day evaluation copy of SecureFX is available and can be downloaded at http://www.vandyke.com/download/securefx/index.html.

If budget constraint is an important issue, then check out www.openssh.org for free SSH clients, such as WinSCP (secure copy with PuTTY) and Secure iExplorer GPL (another Explorer-like interface), for the Windows platform. However, keep in mind that some free clients – as is the case with some third-party clients – may only be compatible with SSH1 and not SSH2 protocol. SSH2 provides improvements over SSH1 and both versions protect sensitive data in file transfers by utilizing strong cryptography that is difficult to hack. Although SSH is typically used to address the security issues of telnet, remote shell (rsh), and remote login (rlogin), standard non-secure transfer programs can benefit from SSH2.

The combination of password and public key authentication (private / public key pair) using digital signatures – per account or shared key among trusted hosts – enable host-to-host encrypted connections over an insecure infrastructure, such as the Internet. However, depending on the size of the organization, it is important to plan ahead and determine the number of public keys that will be supported by the SSH2 server. For example, WinSSHD Server can be configured to require 1) a password or key, and 2) a password and key combination for authentication. But rather than generate a key from every host and then register the key on the WinSSHD Server, you can copy the private / public key pair and distribute the key pair to a group of trusted hosts. Unlike the private key, which is stored on the host side only, the public key is uploaded to the WinSSHD Server, and is stored on both the host, and on the server; the server acknowledges the public key, once uploaded and assigned to a specific login account. If supporting both password and key authentication, the client must be configured to match the authentication set on the WinSSHD Server.

SecureFX (SFTP Client)

Consider changing the default SSH2 port 22 to a unique port (refer tohttp://www.iana.org/assignments/port-numbers for a 5 digit port number) on the SFTP client and SSH2 server. Create a new session by going to File>Connect and then selecting the New Session Wizard. Choose SFTP for Protocol, enter the Host IP address of the WinSSHD Server, and replace port 22 with a unique port.

Next, enter the username and password created on the WinSSHD Server – the username is an account that exists locally on the server. The Initial Directory and other connection settings can be overwritten by the configuration set on the WinSSHD Server. Right-click on the newly created session and select Properties.

Next, confirm that Protocol, Hostname, Port, and Username reflect your input. (Note that password is set for primary authentication; secondary authentication is set to none, by default. We will revisit this section later on.) Go to Category>Site>SSH2 Options and confirm that “None” is NOT selected for Cipher or MAC. Now, double-click on the new session to authenticate to the WinSSHD Server using password. Upon contacting the server, you will receive a New Host Key message box. Click on the Accept & Save button to accept the host key (e.g., MD5 hash fingerprint) from the server.

At this time, you should be able to log in using password authentication. If you receive an error: “Unable to authenticate using any of the configured authentication methods,” it is most likely due to the setting “PWD and Key” in WinSSHD Server (see below) – in which case, you will need to change the SFTP client authentication to “Password and Key”, to match the authentication requirements of the server. Now let’s create the public-key that will be copied up to the WinSSHD Server. To generate a new public / private key pair, go to Tools>Create Public Key to launch the Key Generation Wizard. Select DSA For Key type, enter a Passphrase, and then select 1024 bits (minimum recommended strength) for Key length. Next, move the mouse around to create random input for the key generation process. Name the private key and note the default location for both keys (the public key has the suffix .pub):

C:Documents and Settings<username>Application DataVanDykeSecureFX<FILE>

Use the key as global public key. The public key is now available and can be copied up to the WinSSHD Server; only the public key will need to be copied to the server, the private key will be stored on the SFTP client (host). If the public key will be shared, then copy the key pair and store the files in the above path on the other hosts. Instead of generating a key next time, go to Category>General>Options>SSH2 and then load the public key (do not attempt to load the private key, this key has to be present with the public key in the same folder.) If the public key will not be shared, then generate a public key on each host and then assign the key on the WinSSHD Server to the user account. After you have copied the public key to the WinSSHD Server and assigned the key to an account, go back to File>Connect and select Properties on the recently created session. In Site, change the Secondary Authentication from none to Public Key, and click on the Properties button. Select the newly created public key (that was previously copied up to the WinSSHD Server). Make sure that you have stored the public key in the appropriate folder on both the SFTP host and the WinSSHD Server. WinSSHD Server In WinSSHD Control Panel, click on the Edit/View Settings button in the Settings tab, and change the default SSH2 port 22 to a unique port (refer to http://www.iana.org/assignments/port-numbers for a 5 digit port number). Next, go to Settings>Access Control>Template and set the following:

Permit Remote Administration = No Map Remote Home Directory = No Permit Terminal Shell = No Terminal Shell = C:Program FilesBitvise WinSSHDsftps.exe Initial Directory = C:<unique folder name> Permit Exec Requests = No Permit C2S Port Forwarding = No Permit S2C Port Forwarding = No

Drop down to the Accounts section and deny “all others” from authenticating to WinSSHD. Enter a local Win2K/NT account, and change the Authentication Type to “PWD and Key”. Except for SFTP, everything else on the account should be set to no. Click on the Keys field for the account that will use the public key (the one created on the SecureFX client), and import the key.

Stop and Start the WinSSHD service.

Note: Use caution when using PuTTY as there have been reported bugs, such as no limits on socket buffering and issues with SCP.

Congratulations! You have configured an SFTP client and an SSH2 server.

Original page here
rhel7 managing services with systemd

Tackling service management with Linux systemd

Systemd is a radical change from the old method of Linux service management. It provides a generic interface not just for services, but also for hardware management.

Until the launch of Linux Upstart a few years ago, Linux used an init-based startup procedure. Upstart was designed to make Linux startup more efficient, but it had a very short life. It was barely off the drawing board when systemd came along and replaced it on major Linux distributions as the method for service startup and management.

IT admins accustomed to finding service scripts in the /etc/[rc.d/]init.d directory of their favorite Linux distribution will notice they aren’t there anymore. All that remains are a limited number of services that don’t have a systemd startup script yet. On a Fedora system, the systemd services are in the /etc/system/system directory that contain symbolic links to the real location of the service scripts in usr/lib/system/system. In this directory, a subdirectory named multi-user.target.wants contains service scripts for the services that a system has installed.

In Linux systemd, the concept of runlevels was dropped. While booting, the computer goes through a series of phases, which are referred to as wants. The definition of a want is not as strict as the definition of a runlevel, so you will see differences here between the different Linux distributions. On a Fedora 17 system, for instance, you’ll find the following important wants:

  • sysinit.target.wants: contains scripts that have to be started at a very early stage
  • basic.target.wants: more scripts that have to be started at a very early stage
  • multi-user.target.wants: normal services that you typically need to have an operational system

In addition to these generic wants, there are some specific ones. You may find, for instance, the bluetooth.target.wants (to start Bluetooth) and the getty.target.wants used to initialize the ttys for users. In these wants you’ll find the service scripts themselves. But again, you’ll notice there are differences between the distributions, as every distribution can create its required wants.

The startup scripts themselves aren’t really startup scripts anymore. In the old startup procedure, bash shell scripts were used to launch services. Now you’ll find startup scripts that pass parameters required by systemd to start the services, which makes it very easy to understand how a service is started (see Example 1).

Example 1: A system-style init script for Linux systemd.

[root@IAD multi-user.target.wants]# cat sshd.service
[Unit]
Description=OpenSSH server daemon
After=syslog.target network.target auditd.service

[Service]
EnvironmentFile=/etc/sysconfig/sshd
ExecStartPre=/usr/sbin/sshd-keygen
ExecStart=/usr/sbin/sshd -D $OPTIONS
ExecReload=/bin/kill -HUP $MAINPID

[Install]
WantedBy=multi-user.target

This very clean service script defines variables that systemd uses. All of the service scripts follow more or less the same syntax, which makes managing them a lot easier compared to the diverse init scripts.

Not only does systemd take care of items that were considered services in an init-based startup, it also handles part of hardware management. So when looking into the services system manages, administrators will see network devices, ttys and more.

Using systemctl to manage Linux services

The systemctl command, used for managing services, replaces old commands likeservice and chkconfig, which you’ll only have to use to manage old services that don’t have a systemd-compatible script. Start by typing systemctl by itself. This shows a list of all services Linux systemd manages as well as their current statuses (see Example 2).

Example 2: Use systemctl to show a list of services 

mdmonito…keover.service loaded active exited Software RAID Monitor Takeover
mysqld.service loaded active running MySQL database server
NetworkManager.service loaded active running Network Manager
nfs-idmap.service loaded active running NFSv4 ID-name mapping daemon
nfs-lock.service loaded active running NFS file locking service.
nfs-mountd.service loaded active running NFS Mount Daemon
nfs-rquotad.service loaded active running NFS Remote Quota Server
nfs-server.service loaded active exited NFS Server
ovirt-engine.service loaded active running oVirt Engine
postgresql.service loaded active running PostgreSQL database server
prefdm.service loaded active running Display Manager
rpcbind.service loaded active running RPC bind service
rsyslog.service loaded active running System Logging Service
rtkit-daemon.service loaded active running RealtimeKit Scheduling Policy Service
sendmail.service loaded active running Sendmail Mail Transport Agent
sm-client.service loaded active running Sendmail Mail Transport Client
smartd.service loaded active running Self Monitoring and Reporting Technology (SMART) Daemon
spice-vdagentd.service loaded active exited LSB: Agent daemon for Spice guests
sshd.service loaded active running OpenSSH server daemon
system-s…yboard.service loaded active running System Setup Keyboard
systemd-journald.service loaded active running Journal Service
systemd-logind.service loaded active running Login Service
systemd-…ollect.service loaded active exited Collect Read-Ahead Data

For status information about a specific service, use systemctl show followed by the name of the service. The service name typically includes the suffix .service, so use systemctl status sshd.service and not systemctl show sshd.

Systemctl has other useful display options as well, such as systemctl show servicename.service, which lists the current configuration of a particular service.

Example 3: Use systemctl status servicename.service to see the current status of a service

[root@IAD ~]# systemctl status sshd.service

sshd.service – OpenSSH server daemon
Loaded: loaded (/usr/lib/systemd/system/sshd.service; enabled)
Active: active (running) since Wed, 06 Mar 2013 07:44:53 +0100; 6h ago
Process: 1043 ExecStartPre=/usr/sbin/sshd-keygen (code=exited, status=0/SUCCESS)
Main PID: 1085 (sshd)
CGroup: name=systemd:/system/sshd.service
â 1085 /usr/sbin/sshd -D

Mar 06 13:42:32 IAD.example.com sshd[4590]: Connection closed by 127.0.0.1 [preauth]
Mar 06 13:43:32 IAD.example.com sshd[4602]: Connection closed by 127.0.0.1 [preauth]
Mar 06 13:44:32 IAD.example.com sshd[4610]: Connection closed by 127.0.0.1 [preauth]
Mar 06 13:45:32 IAD.example.com sshd[4618]: Connection closed by 127.0.0.1 [preauth]
Mar 06 13:46:32 IAD.example.com sshd[4630]: Connection closed by 127.0.0.1 [preauth]
Mar 06 13:47:32 IAD.example.com sshd[4639]: Connection closed by 127.0.0.1 [preauth]
Mar 06 13:48:32 IAD.example.com sshd[4651]: Connection closed by 127.0.0.1 [preauth]
Mar 06 13:49:32 IAD.example.com sshd[4660]: Connection closed by 127.0.0.1 [preauth]
Mar 06 13:50:32 IAD.example.com sshd[4670]: Connection closed by 127.0.0.1 [preauth]
Mar 06 13:51:32 IAD.example.com sshd[4686]: Connection closed by 127.0.0.1 [preauth]

To start a service for the first time, use systemctl start servicename.service; to stop that service, use systemctl stop servicename.service. These allow you to start or stop a service once. If you want a service to start every time your computer boots, usesystemctl enable servicename.service. If you don’t want the service on your computer at all, use systemctl disable servicename.service.

Original page is here

Grub2 explained

Linux boot options in RHEL, SLES help ailing servers

GRUB2 and systemd present a major change for Linux boot options in Red Hat Enterprise Linux 7 and SUSE Linux Enterprise Server, including a change in how admins troubleshoot a server that doesn’t boot properly and requires essential recovery tasks.

When a Linux server boots, it first reads the GRUB2 configuration to discover which disk contains the root file system, as well as where to find the kernel and initramfs. If something is configured incorrectly, the system administrator must change the settings to allow the server to boot properly.

GRUB2 boot options

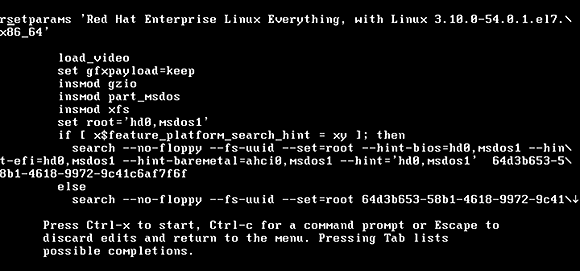
Figure 1. Editing GRUB2 boot options.

To do so, press the Escape key when GRUB2 loads to see available boot options. Select the option you want to modify and press e to enter the editor mode. This will show all the options that are loaded from the GRUB2 configuration files in /etc/default/grub and /etc/grub.d.

From the Linux boot options menu, select the line that you want to edit. Often, this is the line that loads the kernel. Some of the most important boot options have changed in RHEL 7 and SUSE LES. Systemd.units, or collections of systemd services that need to be started, replace runlevels, rescue mode and emergency mode.

Systemd.units provide many services for Linux boot options. And there are a few key systemd.unit services that all Linux administrators must know:

  • rescue.target: Rescue mode, which loads all the services needed for a fully operational system, but no network services or other non-essential services. It is comparable to runlevel 1 from the init boot procedure.
  • emergency.target: A minimal mode in which almost nothing is loaded. You’ll have a root file system, but very few services. This target can be compared to passing theinit=/bin/bash mode when starting on an init-based server.
  • multi-user.target: Replaces the runlevel 3. It is the basic mode a server starts in by default.
  • graphical.target: The new version of runlevel 5 that starts all services as well as the graphical interface.
  • poweroff.target: The old runlevel 0, which shuts down the server.
  • reboot.target: The old runlevel 6, which reboots a server.

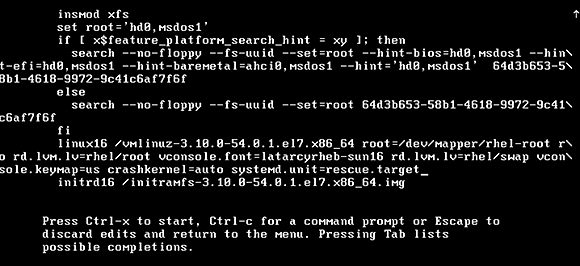
To specify which targets to use during boot, pass them as an argument to the GRUB2 line that loads the kernel. To do this, you should either specify systemd.unit=emergency.target, or add the name of the target you want to start to the end of the line that loads the kernel.

Editing targets

Figure 2. Specifying the target you want to start at the end of the line that loads the kernel.

To enter any of these targets, use the systemctl command — as in systemctl isolate reboot.target. Distribution vendors keep the old commands operational to simplify the process. So if you cannot get accustomed to the new way of working, the telinit 6 command will work.

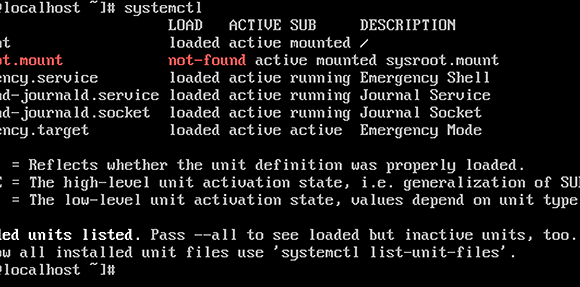
When you finish applying modifications to the line from the GRUB menu, use Ctrl-X to boot. Once in a specific mode, like emergency mode, type the systemctl command to find out which systemd services started. This provides an overview of all loaded services. In emergency.target mode, these will be minimal (see Figure 3).

Services in emergency.target mode

Figure 3. Getting an overview of currently loaded services.

After troubleshooting, use systemctl, followed by the name of the target you want to go, to restart the normal server state. For example, type systemctl isolate multi-user.target to start the equivalent of runlevel 3.

Changing GRUB2 default settings

If you entered the GRUB2 boot menu to modify the default GRUB2 startup, you should permanently apply them to GRUB2 configuration. Type the command grub2-mkconfig -o /boot/grub2/grub.cfg. This writes the settings you used to boot your server to the default GRUB2 configuration file /boot/grub2/grub.cfg. It only works if your grub configuration contained some real errors.

/etc/default/grub configuration file

Figure 4. The /etc/default/grub configuration file.

Change the grub configuration to change the default behavior of GRUB2. Start with the file /etc/default/grub, which contains most of the common GRUB2 settings you had to change. The GRUB_CMDLINE_LINUX line contains every option that your server’s kernel starts with by default. Modifying this line applies changes permanently.

Aside from the /etc/grub/default file, there are also files in the /etc/grub.ddirectory, which rarely require modification.

After applying changes to the GRUB2 configuration files, write them to your system with thegrub2-mkconfig -o /boot/grub2/grub.cfg command.

Original page here

RHEL 7 and firewalld

A few ways to configure Linux firewalld

Initially, firewalld looks difficult to use, but it really isn’t. Services and zones make it easy to put the pieces together and configure Linux firewalls.

Although it also works on the netfilter code in the Linux kernel, firewalld is totally incompatible with the old way to configure Linux firewalls. Red Hat Enterprise Linux 7 and other current distributions rely on this new method.

All examples of commands in this article are based on RHEL 7.

Firewalld works with zones

First, verify that firewalld is running. Use the command systemctl status firewalld(Listing 1).

Listing 1. This sequence shows that firewalld is active and running. Some lines were ellipsized; use -l when you try it to show them in full.

[root@rhelserver ~]# systemctl status firewalld

firewalld.service – firewalld – dynamic firewall daemon

   Loaded: loaded (/usr/lib/systemd/system/firewalld.service; enabled)

   Active: active (running) since Thu 2014-05-22 07:48:08 EDT; 14min ago

 Main PID: 867 (firewalld)

   CGroup: /system.slice/firewalld.service

           └─867 /usr/bin/python -Es /usr/sbin/firewalld –nofork –nopid

May 22 07:48:08 rhelserver.example.com systemd[1]: Started firewalld – dynami…

Everything in firewalld relates to one or more zones.

After installation, a RHEL 7 server is normally in the public zone, but you may want to add it to another zone to easily configure firewall access. The command firewall-cmd --get-default-zone shows which zone you’re in, and firewall-cmd --get-zones shows the available zones. For detailed information about the configuration of a specific zone, you can use firewall-cmd --zone=zonename --list-all (Listing 2).

Listing 2. These commands show the zone or zones in which you’re setting up Linux firewalls.

root@rhelserver ~]# firewall-cmd –get-default-zone

public

 [root@rhelserver ~]# firewall-cmd –get-zones

block dmz drop external home internal public trusted work

[root@rhelserver ~]# firewall-cmd –zone=public –list-all

public (default, active)

  interfaces: ens33

  sources:

  services: dhcpv6-client sander ssh

  ports:

  masquerade: no

  forward-ports:

  icmp-blocks:

  rich rules:

Changing the current zone isn’t difficult: Use firewall-cmd --set-default-zone=home, for example, to change the default zone assignment from public to home.

Services and other building blocks

There are a few basic building blocks in the zones — services are the most important. Firewalld uses its own set of services that are configured using XML files in the directories /usr/lib/firewalld/services (for the system default services) and /etc/firewalld/services for services that you, the administrator, create. To configure services, create an XML file based on the example from Listing 3.

Listing 3. An example of a configuration of firewalld services.

[root@rhelserver services]# cat ftp.xml

<?xml version=”1.0″ encoding=”utf-8″?>

<service>

  <short>FTP</short>

  <description>FTP is a protocol used for remote file transfer. If you plan to make your FTP server publicly available, enable this option. You need the vsftpd package installed for this option to be useful.</description>

  <port protocol=”tcp” port=”21″/>

  <module name=”nf_conntrack_ftp”/>

</service>

Each service definition needs a short name, a description, a port section that specifies the protocol and port to be used, and a module name.

Listing 4. This example of a configuration file will create a firewalld service.

[root@rhelserver services]# cat sander.xml

<?xml version=”1.0″ encoding=”utf-8″?>

<service>

  <short>Sander</short>

  <description>Sander is a random service to show how service configuration works.</description>

  <port port=”666″ protocol=”tcp”/>

</service>

Once you have the right service file, use these commands to manipulate it.

The command firewall-cmd --list-services shows a list of all services that were found on your server. To add a service, use firewall-cmd --add-service yourservice to put it into the default zone, or add --zone=zonename to choose a specific zone.

Here’s how it works:

1. The command firewall-cmd --zone=public --list-all shows the current configuration of the public zone.

[root@rhelserver ~]# firewall-cmd –zone=public –list-all

public (default, active)

  interfaces: ens33

  sources:

  services: dhcpv6-client ssh

  ports:

  masquerade: no

  forward-ports:

  icmp-blocks:

  rich rules:

2. The command firewall-cmd --zone=public --add-service=ftp adds the FTP service to the public zone in the Linux firewall.

3. Verify that the FTP service was added successfully by repeating step 1. You will see it in the list of services.

4. Restart your server and repeat step 1. You will see that the FTP service has disappeared. In firewalld, nothing is permanent unless you use the option –permanent.

5. To add FTP to the public zone and make it a permanent setting, use firewall-cmd  --permanent --zone=public --add-service=ftp. It will now survive a reboot.

6. Type firewall-cmd --reload to apply all rules and reload the firewall.

It is extremely important when working with firewalld to use the --permanent option to make settings permanent.

Breaking the rules

Services are the preferred way of configuring firewalld, easily providing a global overview of what your firewall is doing. But if you don’t want to make your own service file in /etc/firewalld/service, you can add ports without them.

To assign a specific port to a specific zone, use a command like firewall-cmd --permanent --zone=dmz --add-port=22/tcp, then use firewall-cmd --zone=dmz --list-all to verify that the port was added successfully. While this is an uncomplicated way to add a port, going through services makes it easier to distribute similar rules across different hosts. Without services, files are hard to distribute, and rules in a configuration file are not that easy.

For even more control, you can — but shouldn’t — use a direct rule. Here’s why:

1. Type firewall-cmd --direct --add-rule ipv4 filter INPUT 0 -p tcp --dport 80 -j ACCEPT.

2. Now type firewall-cdm --list-all to show the configuration for your default zone. Nothing was added that relates to port 80.

[root@rhelserver ~]# firewall-cmd –list-all

public (default, active)

  interfaces: ens33

  sources:

  services: dhcpv6-client ftp ssh

  ports:

  masquerade: no

  forward-ports:

  icmp-blocks:

  rich rules:

Nothing appears about the HTTP port you added because direct rules are writing to theiptables interface, not to firewalld.

3. To show direct rules, use firewall-cmd --direct --get-all-rules. Or use the deprecated command iptables -L instead.

Instead of direct rules, use rich rules, which are written to firewalld instead of iptables(Listing 5).

Listing 5. An example of a rich rule in Linux firewalld.

firewall-cmd –permanent –zone=public –add-rich-rule=”rule family=”ipv4″ source address=”192.168.4.0/24″ service name=”tftp” log prefix=”tftp” level=”info” limit value=”1/m” accept”

Firewalld rich rules offer a maximum amount of flexibility that is similar to what is possible on an iptables firewall.

Many things are accomplished and applied all in Listing 5’s one rule. The specification of IP family, source address and services name may be obvious, but note how the rule handles logging: A specific log prefix is defined, as well as a log level info and a limit value of one message per minute. max.

The Linux administrator can apply filters that look at more than just ports, so rich rules are particularly useful to filter on IP addresses (Listing 6).

Listing 6. This rich rule applies a filter on IP addresses for the Linux firewall.

firewall-cmd –permanent –zone=public –add-rich-rule=”rule family=”ipv4″ \

    source address=”192.168.0.4/24″ service name=”http” accept”

Analyzing zones

The firewall-cmd command is one of many methods to configure firewalld. Alternatively, you can edit the zone configuration file directly. This doesn’t give you any feedback on wrong syntax, but it’s a clean and straightforward configuration file that is easy to modify and distribute across multiple servers.

Listing 7. You can configure firewalld by editing the zone configuration file.

<?xml version=”1.0″ encoding=”utf-8″?>

<zone>

  <short>Public</short>

  <description>For use in public areas. You do not trust the other computers on networks to not harm your computer. Only selected incoming connections are accepted.</description>

  <service name=”dhcpv6-client”/>

  <service name=”ssh”/>

  <rule family=”ipv4″>

    <source address=”192.168.4.0/24″/>

    <service name=”tftp”/>

    <log prefix=”tftp” level=”info”>

      <limit value=”1/m”/>

    </log>

    <accept/>

  </rule>

</zone>

The example in Listing 7 includes all that was added in the previous examples, written directly to the zone configuration file, with the exception of direct rules. Direct rules have their own configuration file:

[root@rhelserver firewalld]# cat direct.xml

<?xml version=”1.0″ encoding=”utf-8″?>

<direct>

  <rule priority=”0″ table=”filter” ipv=”ipv4″ chain=”INPUT”>-p tcp –dport 80 -j ACCEPT</rule>

</direct>


Came from here

Setting up vsftp on RHEL/Centos 6

Requirements

For the purposes of this excersice we will be using RHEL/Centos 6.  Ftp is a very light weight service, and should work on just about any modern system.

Installing the VSFtpd Server

yum install vsftpd

Yup.. it’s that simple.

Configuring the VSFtpd Server

This one will take a bit of work, but I like to do monkey instructions so they’ll be following shortly.  I made this post as I was installing my home server.


References:

  • http://www.firewall.cx/linux-knowledgebase-tutorials/system-and-network-services/875-linux-vsftpd-setup-configure.html
  • https://access.redhat.com/site/documentation/en-US/Red_Hat_Enterprise_Linux/6/html/Managing_Confined_Services/chap-Managing_Confined_Services-File_Transfer_Protocol.html (Requires Redhat login)
  • SELinux Change: https://access.redhat.com/site/documentation/en-US/Red_Hat_Enterprise_Linux/6/html/Managing_Confined_Services/chap-Managing_Confined_Services-Targeted_policy.html#sect-Managing_Confined_Services-Targeted_policy-Type_Enforcement

Star Citizen Resources

I own two ships at this point:

The Gaming Rig:

  • Joystick : Thrustmaster T-16000M Flight Stick (link)
  • Delta Throttle (link)  This looks like a great idea, but the project appears to be abandoned.  I’m archiving a zip file of the project just in case it disappears in the near future as the domain disappeared. (DeltaThrottle-master)

Model can be extracted from the holoviewer here.

I did find a place where they have models listed (here).  These ctm files can be converted using MeshLab.

A few resources that are popping up for the Star Citizen Game

Model Dump:

  * Gamma: https://robertsspaceindustries.com/media/ae409zabrvn6rr/source/CNOU-Mustang-Gamma.ctm
  * Delata: https://robertsspaceindustries.com/media/ae409zabrvn6rr/source/CNOU-Mustang-Delta.ctm
  * Omega: https://robertsspaceindustries.com/media/ae409zabrvn6rr/source/CNOU-Mustang-Omega.ctm
  * Beta: https://robertsspaceindustries.com/media/ae409zabrvn6rr/source/CNOU-Mustang-Beta.ctm

Aurora: https://robertsspaceindustries.com/media/891b8unsmtxhlr/source/RSI-Aurora2.ctm

Idris: https://robertsspaceindustries.com/rsi/static/ctm/Idris.ctm

Gladius: https://robertsspaceindustries.com/rsi/static/ctm/Gladius.ctm

Freelancer:

  * Freelancer: https://robertsspaceindustries.com/media/h31sdu0iioxgjr/source/MISC-Freelancer.ctm
  * DUR: None
  * MIS: None
  * MAX: None

XianScout: https://robertsspaceindustries.com/rsi/static/ctm/XianScout.ctm

Avenger: https://robertsspaceindustries.com/rsi/static/ctm/Avenger.ctm

Cutlass:

  * RED: https://robertsspaceindustries.com/media/8o1zgqthomxspr/source/DRAKE-Cutlass-Red.ctm
  * BLUE: https://robertsspaceindustries.com/media/eog8cgs8j9g9tr/source/DRAKE-Cutlass-Blue2.ctm
  * BLACK: https://robertsspaceindustries.com/media/czvjre43bozh0r/source/DRAKE-Cutlass3.ctm

Constellation:

  * Andromeda: https://robertsspaceindustries.com/media/dwwjcjv8h77str/source/RSI-Constellation-Andromeda_LOD2.ctm
  * Taurus: https://robertsspaceindustries.com/media/gofcvcfhbztatr/source/RSI-Constellation-Taurus_LOD2.ctm
  * Aquila:  https://robertsspaceindustries.com/media/5epugvdnfbf0vr/source/RSI-Constellation-Aquila_LOD2.ctm
  * Phoenix: https://robertsspaceindustries.com/media/5epugvdnfbf0vr/source/RSI-Constellation-Phoenix_LOD2.ctm

Carrack: https://robertsspaceindustries.com/media/o3v4665e1v96br/source/ANVIL-Carrack_LOD2.ctm

Gladiator: https://robertsspaceindustries.com/media/0z6gvbcvhpvqmr/source/ANVIL-Gladiator_LOD1.ctm

P-52 Merlin: https://robertsspaceindustries.com/media/800yi0d4qqtqgr/source/KRUEGER-Merlin.ctm

Orion: https://robertsspaceindustries.com/media/1v8ddmkxqouesr/source/RSI-Orion2.ctm

Scythe: https://robertsspaceindustries.com/media/21qi67il3hjrar/source/VANDUUL-Scythe4.ctm

Redeemer: https://robertsspaceindustries.com/media/b6yyffpc7vh5jr/source/AEGIS-Redeemer.ctm

M50: https://robertsspaceindustries.com/media/58xweetx5t1dor/source/ORIGIN-50.ctm

890: https://robertsspaceindustries.com/media/5fcemofuv7ta9r/source/ORIGIN-890JUMP12.ctm

Retaliator: https://robertsspaceindustries.com/media/h3h448c01rik3r/source/AEGIS-Retaliator.ctm

Herald: https://robertsspaceindustries.com/media/xbkyhqvjrc819r/source/DRAKE-Herald_LOD4.ctm

Vanguard: https://robertsspaceindustries.com/media/jgq01rt1qdc35r/source/AEGIS-Vanguard.ctm

Pisces Variants (April Fool’s):

* Major: https://robertsspaceindustries.com/media/jodpzpt1hu79jr/source/VanduulCapitalShipB.ctm * Labroides: https://robertsspaceindustries.com/media/eojetxx1jjeuvr/source/VanduulCorvette.ctm * Ductor: https://robertsspaceindustries.com/media/69yw7nttf1ik0r/source/VanduulEscortShip.ctm * Moya: https://robertsspaceindustries.com/media/4rxmoro492i43r/source/Moya.ctm * Pirata: https://robertsspaceindustries.com/media/qvfphs31644rfr/source/Pirates.ctm * Bessius: https://robertsspaceindustries.com/media/lwwdqs53xn0ojr/source/Bessie.ctm * Nautilus: https://robertsspaceindustries.com/media/s74sctbf1ate4r/source/Nautilus.ctm * Croceus: https://robertsspaceindustries.com/media/lvgbrl9p0t35tr/source/YellowSub.ctm * Rapier II: https://robertsspaceindustries.com/media/eg1p4at2e670sr/source/Rapier.ctm * Dralthi: https://robertsspaceindustries.com/media/ksi0rj83qg6kgr/source/Dralthi.ctm

Reliant:https://robertsspaceindustries.com/media/ggvscct10a5hwr/source/MISC-Reliant.ctm

Starfarer:https://robertsspaceindustries.com/media/czc4kuisdi8p4r/source/MISC-StarFarer.ctm

Hull A:https://robertsspaceindustries.com/media/8ay6e9wxefsn0r/source/MISC-HullA.ctm

Hull B:https://robertsspaceindustries.com/media/8jqd89mpxcovrr/source/MISC-HullB.ctm

Hull C:https://robertsspaceindustries.com/media/3a5p02rnr932vr/source/MISC-HullC.ctm

Hull D:https://robertsspaceindustries.com/media/u044v5azkzfwtr/source/MISC-HullD.ctm

Hull E:https://robertsspaceindustries.com/media/st2avbfbqgj5br/source/MISC-HullE.ctm

Pulling models directly from the game itself:

  • https://forums.starcitizenbase.com/topic/22691-how-to-guide-for-extracting-and-modding-star-citizen-assets/
  • https://robertsspaceindustries.com/spectrum/community/SC/forum/50172/thread/howto-create-your-own-art-using-game-assets
    • Video Tutorial (link) (link)
    • Source code is here, but it’s not really github (link)
    • The SCconverter on the github failed to download, found an alternative (link)

Cygwin Installation

Wherever you have your cygwin setup program, do the following. setup.exe -q -P  wget,tar,qawk,bzip2,subversion,vim Open Cygwin and perform the following: svn –force export http://apt-cyg.googlecode.com/svn/trunk/ /bin/ chmod +x /bin/apt-cyg   Syntax: apt-cyg install <package names>” to install packages 
apt-cyg remove <package names>” to remove packages 
apt-cyg update” to update setup.ini 
apt-cyg show” to show installed packages 
apt-cyg find <pattern(s)>” to find packages matching patterns 
apt-cyg describe <pattern(s)>” to describe packages matching patterns 
apt-cyg packageof <commands or files>” to locate parent packages       —-> install mysql server apt-cyg install mysqld mysql_install_db -user=root -ldata=/var/lib/mysql To start mysqld at boot time you have to copy support-files/mysql.server to the right place for your system PLEASE REMEMBER TO SET A PASSWORD FOR THE MySQL root USER ! To do so, start the server, then issue the following commands: /usr/bin/mysqladmin -u root password ‘new-password’ /usr/bin/mysqladmin -u root -h sumomo password ‘new-password’ Alternatively you can run: /usr/bin/mysql_secure_installation which will also give you the option of removing the test databases and anonymous user created by default. This is strongly recommended for production servers. See the manual for more instructions. You can start the MySQL daemon with: cd /usr ; /usr/bin/mysqld_safe & You can test the MySQL daemon with mysql-test-run.pl cd /usr/mysql-test ; perl mysql-test-run.pl Please report any problems with the /usr/bin/mysqlbug script!

  1. cd /usr ; /usr/bin/mysqld_safe &
  2. /usr/bin/mysql_secure_installation

Installing php5 on cyrgin

  1. setup.exe -K http://cygwinports.org/ports.gpg
  2. Follow notes here: http://sourceware.org/cygwinports/
  3. Add ftp://ftp.cygwinports.org/pub/cygwinports

Seafile: Install and Set


  • Seafile
    • wget https://bitbucket.org/haiwen/seafile/downloads/seafile-server_2.2.1_x86-64.tar.gz
    • tar zxf seafile-server_2.2.1_x86-64.tar.gz
    • apt-get -y install libevent-dev libcurl4-openssl-dev libglib2.0-dev uuid-dev intltool libsqlite3-dev libmysqlclient-dev libarchive-dev libtool libjansson-dev valac libfuse-dev sqlite3 python-mysqldb
    • Install libzdb
    • Install libevhtp
  • Seahub (Web Env)
    • apt-get -y install python-djblets sqlite3 python-simplejson python-image chardet gunicorn
  • Prepare Directories
    • cd seafile dir
    • ./seafile-setup.sh


OpenLDAP on Centos 6

yum install openldap-servers system-config-firewall-tui

sed -i “s/example/owncloudbook/g” olcDatabasse={2}bdb.ldif

openssl req -new -x509 -nodes -out /etc/pki/tls/certs/owncloud-cert.pem -keyout /etc/pki/tls/certs/owncloudbook.key.pem -days 3650

chown root:ldap /etc/pki/tls/certs/owncloudbook*

chmod 750 /etc/pki/tls/certs/owncloudbook*
echo << {olcDatabase={2}bdb.ldif EOF

olcTLSCertificateFile: /etc/pki/tls/certs/owncloudbook-cert.pem

olcTLSCertificateKeyFile: /etc/pki/tls/certs/owncloudbook-cert-key.pemsed -i /example/owncloudbook/g” olc

EOF

sed -i “s/example/owncloudbook/g” olcDatabase={1}monitor.ldif

cp /usr/share/openldap-servers/DB_CONF.example /var/lib/ldap/DB_CONFIG

chown -Rf  ldap:ldap /var/lib/ldap

vi /etc/sysconfig/ldap

SLAPD_LDAPS=yes

–> save and close

slaptest -u

services lapd start

TLS_CACERRT /etc/pki/tls/certs/owncloudbook-cert.pem

URI ldap://127.0.01

BASE dc=owncloud,dc=com

–> save and close

ldapsearch -x -b “dc=owncloudbook,dc=com”


groups.ldif and users.ldif

vi /etc/openldap/schema/base.ldif

dn: dc=owncloudbook,dc=com

dc: owncloudbook

objectClass: top

ocjbectClass: domain

dn: ou=Users,dc=owncloud,dc=com

ou: Users

objectClass: top

objectClass: organizationalUnit

dn: ou=Group, dc